Showing posts with label demolition. Show all posts

Monday, July 24, 2017

ANOTHER Vintage Camper!

We did a thing! 


If you've been following along for a while or if it somehow slipped your mind, in 2012 we purchased a vintage camper for $500 and turned it into a traveling photo studio and darkroom. Flash forward a few years and it's still rollin' but with digital guts. Read all about that here

But if you want more beat up, before pictures and the story of how we found this cutie, keep reading!


We have been wanting to downsize for a while now. Since we stopped developing photos in the camper, having an extra 5 feet or so for a darkroom was unnecessary. Also, since we started Lamphouse, there have been a number of venues open in up in Wichita that could easily accommodate a camper smaller than Lampy. Throw that together with the fact that we've gotten a warm response for the "Lampy" camper as a digital photo booth and we were ready to start looking in earnest for a smaller camper to fix up.

Problem is, in the past 5 years things like "glamping" and "putting a photo booth in a vintage camper" have become ~things~ thereby driving the price up on old campers and even making hard to find ones that aren't fixed up already.

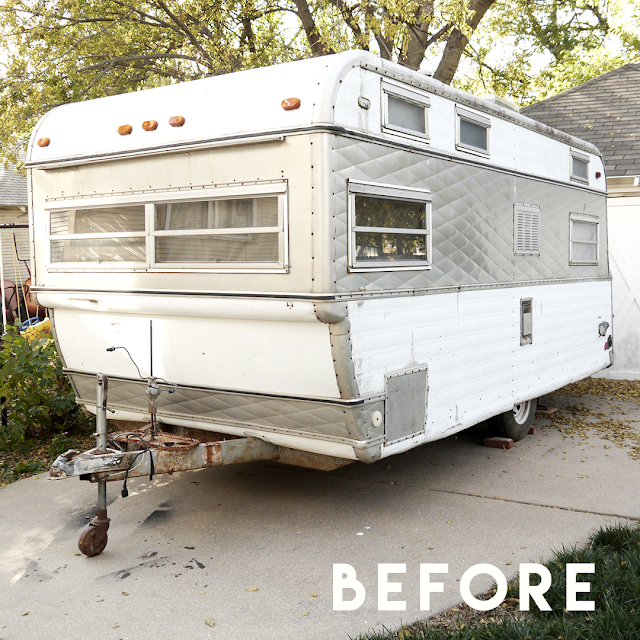
View from the hitch. This window is definitely not original. Hoping to replace it with one that is or similar. 


So a few weeks ago I decided to start really looking. That means checking craigslist about two dozen times a day, along with any other classified you can find and even, if you have NO shame, asking your neighbor who has one in their backyard if they'd ever consider getting rid of it...


We stopped in Russell and got duct tape for this window. It lasted about...1/2 a mile I'd guess. 

I found a really cute one on a classifieds site in a town called Russell, about 160 miles away but it said that it had been sold. Womp womp. I thought my chances would be better on a smaller site than Craigslist so I checked again that night and WHAT WHAT there it was - for sale again!

The seller told us that the man he bought it from was using it to go fishing at the lake. 

It was already 11 o'clock at night so I couldn't call the business number that was listed. I set my alarm for the next morning and immediately dialed the number - the camper was still there and still $600. One problem? The tires were mush.

A Loveland, Colorado sticker

We went ahead and drove straight up in the Jeep and had a look at it. Conan mentioned there was a camper parts store in town that we could maybe get tires at and the man selling it said that would be a bust so he called the local tire shop and lo and behold, he had 2 perfect, used tires! The seller even jacked up the camper and took the wheels off for us! Kansas nice, y'all!

From the other end - cute marker lights! 

So we got two tires, put them on and headed home on side roads and two lane highways. A trip that took 2 hours going took 4.5 coming back. Now that's what you call "white knuckle driving"!

Here she is parked in Stafford, Kansas on the way home:


The inside is pretty standard fare for an old camper. An area for a table 


A cute little kitchenette


(with an icebox!)


A sleeping area


And some souvenirs! 


I'm keeping that mug.

Conan dug around on the internet and found what he was pretty sure was the make of the camper - an ALJOA (or ALJO if it was after '57). He went out and had a look and sure enough, you can barely make out ALJO on the top and back panels of the camper.

He even found this neat old photo of the exact same camper as ours:


We're SO excited to get to work on her! If you had asked me about 4 years ago if I wanted to restore another camper I...well, I probably would have said yes because I'm crazy and a compulsive business starter but whatever. 

I haven't quite decided if I want to post about renovating the camper over here and on our business blog or just over there yet but I at least wanted to introduce you guys since you "get" us ; ) 

I'm hoping to get in there and start demo this week or next if the weather stays nice-ish.

Next up?

More camper stuff maybe and a look at an AMAZING piece of furniture we got for the kitchen a while back!

If you're interested, our local paper, The Wichita Eagle did a little write up about the original Lampy camper and the new one here

Friday, June 30, 2017

HAPPY 4TH BIRTHDAY LAMPHOUSE!

Hey guys! We've actually made a lot of progress on a few big projects around the house: 
  • Painting the porch
  • Building a new privacy fence
  • Installing a new piece of kitchen furniture antiquer-y that's gonna blow your minds
BUT, we're also right in the middle of wedding season which is also photo booth season and even though I've taken lots and lots of photos of these projects, I haven't had a chance to get all of the many photos edited and put into a coherent post. Soon though, SOON. 

In the meantime, this past week (6/28/2017 to be exact) we celebrated the fourth anniversary of the little business that could, aka Lamphouse Photo Co.! It's nuts to think that we've spent half of our married life working on this. What started as a hair-brained idea about developing photos in a camper has now become our full-time jobs and we're so gobsmacked by that reality every.single.day.

I thought it would be fun to show some before and afters of how it all began with the "Lampy" camper and what things look like today! We took a few photos to commemorate the anniversary this week so here goes!

In October 2012, we purchased what would become our vintage camper photo booth off of Craigslist for $500. 

Vintage Camper Photo Booth Before

And here's what she looked like this past weekend at an event! 

Vintage Camper Photo Booth Before

Pretty cute, huh? We re-painted her metal shell that robin's egg blue color almost a year ago and I love it every time I see it. 

When we got her, we started by gutting the entire inside of the camper and turning it into a shell. Here's the "studio" side of the camper before, during and today:

Vintage Camper Renovation


Vintage camper renovation


Vintage camper renovation


Vintage camper renovation


Vintage Camper Photo Booth

And here's the "darkroom" side of the camper before, during, and today!

Vintage camper renovation


Vintage camper renovation


Vintage camper renovation


Vintage Camper Photo Booth

We still call it the darkroom side even though there is clearly a digital photo booth sitting right there in plain sight. The darkroom is still totally functional and we even took it out last year and developed some photos in it just to prove we could ; ) 

But the truth is, when we took it out as a studio/darkroom we were working ourselves to the bone and making about $100 a month (during the summer/fall months ONLY). Hardly enough to make it worthwhile. So, last September we decided to add a digital booth to the inside and voila! booked twice in the past week alone! I know that a lot of folks might be sad that we went in a different direction than we originally intended but here's the way I look at it: 

are people using it?
yes
are they enjoying the photos it takes?
yes
does it fill me with absolute joy when someone gets inside and goes "WHOA! This is beautiful!"?
yes

Bam! Success! 

Hope you enjoyed our little trip down memory lane! 

Up next, fence photos I think? Thanks for sticking with us and of course, 

KEEP SMILING : ) 

Friday, November 8, 2013

Toilet Closet Update & Inspiration

Well, we've officially finished one week with only one "bathroom" in the house and it's been really great for our relationship. I kid. But seriously, I didn't realize how handy it was having two bathrooms even if one of them, for all intents and purposes, wasn't even a real bathroom. 

Which gets me really excited when I start to think about having an ACTUAL bathroom downstairs with a sink and outlets and room to twirl*
*small twirl, arms only partially extended

So, here's how it looks at the end of week one: 


Here's the before/during/after for reference: 


Things you can see in these pictures: 

  • The toilet flange was removed. That pipe had to be cut down in the basement because the flange was glued into it. No big deal since the pipe is going to have to be re-routed anyway since the toilet will not be in the same place. 

  • The water supply going into the toilet also had to be cut so that we could pull the floor up. We used this neat thing called a shark bite to seal it off. My mom cut the pipe and popped that thing on in just a couple of minutes. 


  • The "floor" has been pulled up. There's still the sub-floor down there but since it looks like the toilet supply was leaking, I'm thinking that wood might not stick around. We'll see. 


  • The most exciting thing is the moving of the return air duct. It's about a foot to the left now and that means more space! It also means that we can start to see where walls will be and how far back we will be able to go on that side of the room. 
Here's a better look at the before and after of that:
BEFORE it was really close to the old bathroom wall, less than a foot.


AFTER it's moved a foot to the left so the wall can go back that much further! Yay walls!


Now then, let's talk fun stuff. Inspiration pictures!
I've noticed when you're looking for pictures of water closets or powder rooms, a lot of the really small ones use a bold color or pattern on the walls. It's kind of counter-intuitive but it works. 

Here are a few looks that I like for one reason or another.


This water closet from Meet the Shaffers has been on my "it" list for a long time. The high gloss green paint, the glossy black light fixtures:


Mmmmm glossy black...
Speaking of glossy black, this bathroom from Lonny may not be as small as ours but I love how the inky black goes all the way to the baseboards and you can see that they used hex tile like we're planning to. 


A few more ahem...bold options include chalkboard walls like this bathroom


I REALLY love the Twombly-ness of this but I'm not sure if it would work for everyday use. I can hear my mom cringing right now and saying something like, "Well, you have clean it!" I think, more than anything I just like the pattern and the colors here. The white, the brown, the blue/black. 

I also really dig using magazine covers or photos as wallpaper like this one from ElleDecor


Or this other one from Lonny
(originally, I thought we might have to do our sink like this - cut into the wall on the left)


Dogs and flowers! Flowers and dogs! That's just a little too bright for my taste but I admire their commitment and I've been brainstorming a way to use all the extra National Geographic covers I come across while thrifting. Hmmmm...

I also really like more traditional colors and styles because there's a chance that someone, someday might not be as excited about a chalkboard bathroom as I was.


My mom mentioned doing tile all the way up the walls just to make it easy to clean but I just don't think it's in our budget. Maybe just paint some faux tiles on? That'd be cool, right? Right?! Either way, I really like the white tiles/black grout and brass fixtures of Mandy Milks's bathroom from House & Home.

So, whadaya' think?

Stick with traditional or try something bolder?

There are pros and cons to each, I suppose. I'm going to try and locate a sink that I like this weekend so we can start thinking about how much room we have when we frame everything in. So I guess I've still got a while until I need to start thinking about paint colors, huh? 

: ) 

Have a great weekend! 

Monday, November 4, 2013

Toilet Closet Demo: Day 1

So, how was everyone's weekend? Was it awesome? Was it just okay? Was it spent in a toilet closet? I kid! 
We actually only spent a few hours in the ol' toilet closet and to be honest with you I was only in it every ten minutes to scoop up the rubble with my heavy duty dustpan and then get back out of the way.

Pro tip: If you're going to demolish any part of a plaster and lath house, buy a really serious dustpan. You will not regret it when it comes time to scoop that junk up. Also, contractor bags. Looooots of contractor bags. 

Alright, so what did we do on day one? Let's have a look! 
Here's where we started: 


Then out came the toilet and off came the door: 


Then it got smashed: 


It took my dad about two hours to get rid of all of the plaster and VERY CAREFULLY remove the door frame and the window frame. 
If you're wondering why we had to do that it's because these houses are usually built with one piece inside of another, inside of another and as such, the lath ran behind the door frame and the window frame, not just up to it. So if we want to remove the lath and replace it with sheetrock, the frames have to come down. 

We started the day by putting plastic and an old sheet over the stairway down to the toilet closet. 
If you've never experienced the nastiness of plaster dust, trust me when I say this is a step you don't want to skip. STUFF.GOES.EVERYWHERE.


Here's the ceiling. It's lovely. 


I didn't really take any pictures of us during demo because 
a) dust + camera = no good
b) the room is barely big enough for one person to stand in alone, when you add pounds and pounds of rubble on the floor it gets increasingly difficult to move around, so removing debris constantly is recommended.

Now, you might have noticed the hole on the left: 


That is the reverse skylight thing we've got going down to the basement: 


But for serious, you can see the return air vent that I mentioned might be an issue if you look here: 


We looked at it this weekend and since the vent itself is a couple of feet and change wide and they just put the duct right in the middle, we think we can move the duct about a foot to the left and still be okay. That would give us about a foot of space and we would still be able to build a bump out around it and go farther back. 

It's highly inaccurate/totally not to scale architectural rendering time with Katherine, y'all! Gather 'round! 


The plan as of this weekend is to move the toilet over to the left wall and push it back as far as we can then put the sink on the right wall or corner, near the window. That way there's at least the illusion of privacy should someone run downstairs and fling the toilet closet open. They'll only see your frightened expression and your knees, instead of a full-on deer-in-headlights type situation. So you've got that goin' for ya. 

I know I also said I would share some inspiration photos I've been gathering but I really don't feel like I should until we have a more concrete idea of the layout. Cart before horse, chickens before hatch...blah blah blah. 

But I will share some ideas that I like this week hopefully. Until then, enjoy your Monday and we'll see you soon! I'm off to pull some lath down! Wish me luck! 


Thursday, April 19, 2012

Staple Pulling Is For The Birds

Put simply, yesterday I got fed up with staple pulling (after pulling about three clean in half, leaving two hypodermic needle-like shards sticking up) and started pulling up that yellow linoleum rug. Well, maybe pull isn't the right word. Pried up is more like it.


Yes, that means there are still staples in the floor! But a few came up with the rug, I swear.
For the most part it was relatively easy to pull up chunks of the rug. A few places were a little more stubborn than others, though.  


In a couple of spots you can see the old what's left of some neat old linoleum that looks like it probably matched the euqally red and black and yellow wallpaper (hey, these people loved color). It's only in a couple of places like I mentioned so I assume they took it up before putting down these other layers.


So this is what we're left with for now. It's pretty rough looking because of all of the pieces of old rug and adhesive left behind. I've been reading about ways to remove the black stuff without using a sander (to avoid stirring it up into the air and lungs). So far, the most promising seems to be using hot water and a scraper like this article over at Apartment Therapy mentions.


Still, it's really not in that bad of shape. I'm going to see how easily we can clean it up and then, if it doesn't look awful, I may leave it just wood for now (no paint). We'll see, though. Who knows?


As for now, you can see there are still chunks left under the appliances so I'm off to start ripping that up. I'll let you guys know how the hot water works out if I get around to trying it today.

If the wood works out, I'm considering using a DIY stain. I've tried ebonizing (steel wool and vinegar) before and it worked great but it turns the floor kind of gray/black which is not what I want in here. Still, there are some pretty neat ideas out there like coffee, tea, tobacco and walnuts!


Related Posts Plugin for WordPress, Blogger...